Monthly Archives: June 2014

10 tips every outlook user should know


We have highlighted the ten most useful extras that you can add to your computer system.

We all become slaves to our PC but sometimes we can make its rigid rules work for us. There are many times when we get interrupted by a trivial email which we cant help but answer because it just takes a few seconds but that interruption can take minutes before your thoughts are back on track. Here is our collection of 10 tricks to make life easier

Use scheduled tasks to automatically launch Outlook at a preferred time.
1. How to start Outlook using scheduled tasks

If you are a slave to email messages you can always dedictae a time slot to deal with emails. Using scheduler allows them to be openend, dealt with and closed until the next scheduled time.

Microsoft Outlook lets you check your email, schedule appointments, view calendars and manage contacts. If you don’t want to manually open the program, Windows has a task scheduling feature that automatically opens Outlook based on a configuration you select. In addition to having the program open when you log on to Windows or start your computer, you may configure Outlook to start daily, weekly or monthly at a specific time.

Step 1
Click the “Start” button. Type “Schedule Tasks” in the search box and press “Enter.” This doesn’t work for Windows8 so contact us and we will send you the necessary steps
Step 2Click “Create Basic Task” under “Actions” in the far-right pane. Select a name for your task next to “Name” and a description for your task next to “Description” on the wizard’s first screen. Click “Next” to proceed.

Step 3Select the time you want Outlook to start under “When Do You Want the Task to Start?” Select “Daily,” “Weekly,” “Monthly” or “One Time” to select a specific time frequency. Select “When the Computer Starts” or “When I Log On” to open Outlook when one of these events occurs. Click “Next” after selecting your option.
Step 4
Use the drop-down lists to select a date and time if you chose to start Outlook daily, weekly, monthly or one time. If you selected to start Outlook weekly, click the box next to the day of the week you want the program to open. If you selected to start it monthly, select the exact day of the month you want it to run. Click “Next” to continue.
Step 5
Click “Start a Program” on the “What Action Do You Want the Task to Perform?” step and click “Next.” Click the “Browse” button next to “Program/Script.” Locate Microsoft Outlook in the dialog box, then press “Enter.” For Microsoft Office 2010 users, “C:Program FilesMicrosoft OfficeOffice14Outlook.exe” is typically the default location.
Step 6
Click “Next” and “Finish” to save your scheduled task for Outlook. The program will start at the time of the scheduled task.
2. Create a Custom View


You’ll spend hours tweaking your system’s settings in the BIOS, even if you spend most of your time surfing the web. And the same holds true when it comes to finding the best overclocking settings for your GPU, even if the end result only nets you a few extra frames per second in your favorite shooter. So why not spend a little time customizing Outlook? After all, assuming you keep the client running all day, you’ll log a considerable amount of time staring at its unwieldy interface during any given work week.


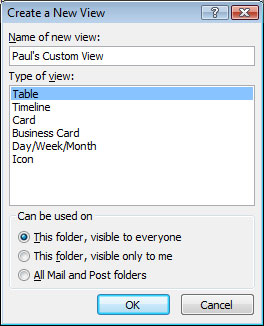
To begin molding Outlook’s UI to better suit your style, click on View>Current View>Define Views. In the pop-up that appears, press New to create a new view and give it a name. This is also where you’ll choose your template (Table, Timeline, Card, Business Card, Day/Week/Month, Icon) depending on what you’re trying to customize. You can use any template you want, but if you’re customizing your mail window, you’ll probably want to stick with the Table template unless you’re shooting for a funky layout.


The next order of business is to arrange the layout by different categories. These are pretty self-explanatory. In the Fields section, for example, you’ll see a list of available fields you can add to your view (as well as remove them) with the click of a button. You can also arrange in what order these fields are shown.


One particularly interesting section is the Filter field. This can come in especially handy if, say, you’re on vacation and want to avoid the temptation to check work emails and be reminded of everything that awaits you after you return from the Bahamas. You can setup filters so that only email sent to your personal address shows up in the inbox, while email to your work addy stays hidden.
Another field you may want to pay attention to is Automatic Formatting. It’s in here where you can customize the appearance of certain messages where you’re listed as a recipient, but in the CC or BCC fields. If you tend to be copied on a lot of emal that’s usually of low interest to you, use this field to divert your attention to emails that are more likely in need of your attention.


You won’t find the option by default, so press the Add button, which brings up an untitled check box. Give it a name, such as ‘To Me’ or ‘Not Copied.’ To make these emails stand out from the rest, click the Font button and change the color.


Next, click the Condition button, which brings up another pop-up window. Check the ‘Where I am’ check box and choose ‘the only person on the To line’ in the accompanying pull-down menu


3. Add a Digital ID to give your recipeints piece of mind

Sign Your Emails with a Digital ID
It’s not at all difficult for hackers to impersonate you by spoofing your email address and sending out emails that appear to come from you. Luckily, there’s something you can do about it to give your recipients some peace of mind that, hey, this email is the real deal. To do that, you need a Digital ID.
You can think of a Digital ID as sort of an electronic driver’s license. The digital certificate, which is verified by a trusted third party, tells the recipient that you are who you claim to be. Anyone can get one, and to get yours, navigate to Tools>Trust Center. Highlight Email Security in the left-hand column and then click the ‘Get a Digital ID’ button.
This brings up the Digital ID page on Microsoft’s Office Marketplace website, which can be a little overwhelming. You can research the available options on your own, or follow our lead and head straight over to InstantSSL by Comodo. It’s free, while most of the alternatives are not.
After filling out the online form, you’ll receive a verification email (ours showed up almost instantly) alerting you that your digital signature is ready for collection. Click the included hyperlink to download and install the certificate.
Now we need to import the certificate into Outlook, but the steps will be slightly different depending on which browser you used to retrieve it. Firefox users will navigate to Tools>Options>Advanced and bring up the Encryption tab. Click on the View Certificates button, highlight your certificate, and click the Backup button to save it to your hard drive. If you’re an IE user, click on Tools>Internet Options and bring up the Content tab. Click on the Certificates button, then press Export and follow the prompts.
To import your certificate into Outlook, fire up your email client and navigate back to Tools>Trust Center>Email Security. Click the Import/Export button, then punch the Browse button to locate the certificate on your hard drive. Fill in the appropriate fields and you’ll all finished!
If you want Outlook to use your digital ID every time you send out an email, navigate once again to Tools>Trust Center>Email Security and click the ‘Add digital signature to outgoing messages’ check box. This can slow things down, so you may opt to only digitally sign emails when the need arises, such as firing off an important email to your boss or co-conspirator for world domination. To manually add a digital ID on an as-needed basis, click on Options in the email you’re composing. Expand the More Options section on the right-hand side, mash the Security Settings button, then check the ‘Add digital signature to this message.’ When you fire off the email, the recipient can check the digital ID and verify that it really came from you!
 
4. Configure Sent Messages to Automatically ‘Reply to All’
Maybe you’re coaching junior’s basketball team and you’re trying to organize a fundraiser with all the parents. Or perhaps you’re attempting to carry on a group conversation with your co-workers on an important project. These are just a couple of scenarios in which it’s helpful if the recipients remember to hit ‘Reply to All’ when responding to emails, but there’s always one knucklehead who doesn’t follow protocol. It’s not that he’s trying to be difficult, he just hit the wrong button.
You can prevent this from happening by forcing all replies to reach every recipient. Here’s what you need to do. Compose a new email message, but before sending it on its way, click the Options button. In the toolbar, you’ll see a button that says ‘Direct Replies To’ (Outlook 2007). Click on it.
Check the ‘Have replies sent to’ check box and then mash the Select Names button. Select the names from your Address book, or enter them in manually in the Reply To field at the bottom.
As a point of good etiquette, you should let the recipients know that you’ve configured email replies be sent to the entire group, even though this should be obvious when they click the Reply button. This will prevent Bob from revealing potentially embarrassing tidbits about his date with Sally to the entire group when he thinks he’s only communicating with you!
5. Backup, Transfer, and Manage Your AutoComplete List


Over time, Outlook becomes pretty adept at predicting who it is you’re trying to email and can usually accurately guess the recipient based on a single keystroke. This saves a ton of time, particularly if one of your frequent contacts has a long and convoluted email addy and you’d rather not poke around your address book. But there’s a problem. As power users, we frequently find ourselves upgrading hardware and reinstalling Windows, which means the entire learning process starts anew. Or does it?


Whether dealing with a fresh Windows install or transferring your Outlook DNA to another machine, you can bring your auto-complete info along for the ride, but you won’t find it in your PST file. Instead, this info lays hidden in a separate NK2 file.
To find it, you first need to close Outlook. Once you do that, navigate to C:Users[username]AppDataRoamingOutlook. If you’re having trouble locating the directory, check to see that you’ve allowed Windows to show hidden files and folders (Control Panel>Appearance and Personalization and click on ‘Show hidden files and folders’ under Folder Options). Alternately, bring up the Start menu and type %APPDATA%MicrosoftOutlook (Start>Run if you’re using XP).
Once you’ve located the NK2 file, simply copy it over to a USB key and then transfer it to the same directory on the destination PC or when you reinstall Windows!
Of course, Outlook doesn’t always correctly guess who you’re trying to email, and that can be frustrating when you’re in a hurry. Not only that, but should one of your contacts switch email addresses or drop off the face of the earth, you’ll want to delete their AutoComplete info. Unfortunately, the only way to do that is to begin typing their name and when it appears, press the down arrow to highlight the entry and the DEL key to nuke it. This can be time consuming if you have a lot of contacts to update, and Outlook doesn’t allow you to edit the NK2 file. Luckily, there’s someone who does
Nir Sofer’s lightweight N2KView executable, which you can download here, displays the email records stored in Outlooks AutoComplete file. Just fire up the app, then proceed to delete any AutoComplete entries that are outdated. You can also use this handy utility to add items from your Address Book, and as an alternative way to backup and restore Outlook’s AutoComplete file. You’ll find all these options in the File menu.
6. Stop, delay and intercept sent e-mails!
Image Credit: masternewmedia.org
After composing that long winded email to your boss letting him know exactly where he can stick that Jelly-of-the-Month Club membership you received instead of a Christmas bonus, you probably felt better, right up until you accidentally hit the Send button out of habit. Or maybe you sent sensitive information to the wrong contact and realized it a second too late. There are several scenarios in which you might wish Outlook had an Unsend button — such as noticing a typo after the fact — but that’s just not how the Internet works.
That doesn’t mean you’re completely out of luck, however. You’ve probably heard the saying, ‘An ounce of prevention is worth a pound of cure,’ and in this case, we’re going to show you how to prevent scenarios like the above using Outlook’s Defer rule.
Outlook’s Defer rule places a temporary hold on all outgoing messages, so while you still can’t unsend email that’s already been thrust into the Internet, this will give you a short window to backtrack when you’re not having one of your better days. To get started, click on Tools>Rules and Alerts.
Next, click on New Rule… to bring up the Rules Wizard window and highlight ‘check messages after sending,’ and then click on Next. This will bring up the Conditions window, which is where you’ll indicate when you want this rule to take effect. Ignore all the check boxes and just click on Next if you want to defer all sent messages, otherwise go ahead and specify under what conditions you want your sent mail to have a temporary hold.
You should now be at the ‘Select action’ window, which is pretty self explanatory. Mark the very last check box that reads ‘defer delivery by a number of minutes.’ At the bottom under Step 2, click the hyperlink to bring up the Deferred Delivery window, and then change the number of deferred minutes to however long you want (we recommend anywhere from 3-5 minutes).
Click Next to setup any exceptions, such as when emails are marked as “importance” or several other options. Hit Next one more time, give your rule a name, and press the Finish button. Now the next time you goof up when sending an email, you can nuke the message from your Outbox and pretend the whole thing never happened!
7. Never Forget an Attachment Again!
If you end up using this plug-in only once, it will have been worth the download. What’s it do? Not much – it just slaps you across the face (gently) when it thinks you may have forgotten to include an attachment so you can avoid having to resend a follow-up email.
There’s no voodoo magic going on here, the plug-in simply sifts through your email looking for words that are most often used when an attachment is supposed to be included. If no attachment exists, a pop-up dialog asks if you meant to add one after you’ve already mashed the Send button. If you did, just hit ‘Yes’ and get an instant do-over. And if it ends up being a false positive, click ‘No’ and move one with your day.
On the downside, the developer doesn’t say which words are flagged, nor can you can add words of your own. Nevertheless, it works well out of the box and could potentially save you from a boneheaded moment.
 
8. Supercharge Your Contacts List with Xobni
Xobni is one of those plug-ins where, once you use it, you’ll wonder how you ever got along without it. Once installed, you’ll be able to search through your contacts faster than was otherwise possible, but that’s only the beginning. Xobni maintains a complete profile of everyone you know, including contact info, profile pictures, recent conversations (threaded!), files exchanged, and so much more.
There’s also a strong social networking element to Xobni. Twitter, Facebook, and LinkedIn all come integrated so you can see which sites your contacts participate in. Does Bob use Twitter? Click his name and find out, then check out his latest tweets, all from within Outlook!
We also appreciate the seamless integration into Outlook’s interface. There’s a lot going on, and Xobni organizes it all in a convenient sidebar that wedges right into the email client. Should you decide you don’t want to look at it, just click the arrow to tuck the sidebar away. How considerate!

9. Filter Mail from Specific Senders to Their Own Folder

Work and play rarely mix, but the problem with Outlook is that it meshes everything into one, whether you want it to or not. You may have separate email accounts setup, but all incoming email still gets clumped into the same inbox. If you don’t want your significant other’s emails mingling with your work mail, you can setup a special folder for that special someone.

To do this, right-click an email from whoever it is you want to have their own folder and select ‘Create Rule.’ Check the check box next to the sender’s name as well as the ‘Move the item to folder’ check box, and then click on Select Folder. Pick or create a folder, and if you want, you can even assign a WAV file, just to be sure to check ‘Play a selected sound’ if you do.

 
10. Archive Old Mail on Your Own Terms
Every once in awhile, Outlook will offer to auto-archive your old email items, but if you take the time to do this yourself, you can keep those old files infinitely more organized than Outlook is able to do on its own.
But why even archive email in the first place? If you don’t, Outlook’s Personal Folders (PST) file will continue to expand, kind of like Jabba the Hutt left unattended at an all-you-can-eat buffet. As the PST file grows in size, Outlook may start to feel sluggish. The rate at which this happens depends on your emailing habits, but whether your a light or heavy email user, at some point, Outlook will lose its initial pep.
Your best course of action is to setup an annual or bi-annual archive. Or if you’re a regular chatty Cathy, a monthly archive may better suit you. No matter what the interval, the basic steps will be the same. To get started, click on File and select Data File Management. Next, click on the Add button and choose the desired format (stick with the default if using Outlook 2007). Click OK and give your archive a name, like ‘2008’ or ‘Jan-June _2008.’ For that warm fuzzy feeling, go ahead and password protect your new archive when prompted.
You should now see two entries in the Data File Management window. Go ahead and close the window because we’re now ready to start archiving items to our newly created PST file. One way to do this is by dragging and dropping individual mail items to the newly created entry under Mail Folders. Depending on much email you need to move, this can take a long time.
A better way to move old files is by navigating to File>Archive. Check the ‘Archive this folder and all subfolders’ radio button if it isn’t already. Next, highlight the folder you want to archive (or your entire Inbox), specify the appropriate date in the ‘Archive items older than’ pulldown menu, and click the browse button to select your newly created archive file and punch OK.
Houston, we have a problem! You followed the above steps, but your original PST file (which you can find by navigating to C:Users[username]AppDataLocalMicrosoftOutlook) is just as large now as it was before you archived all your email. What the flip?
This isn’t cause for concern, it just means Outlook’s automatic background compaction hasn’t kicked in yet. Part of what this does is reclaim the empty space in your PST file and give it back to your hard drive. But if you don’t feel like waiting, or if you have waited and there’s still no change, you can tell Outlook to get to work. Just go back in the Data File Management window, double-click the PST file, and select Compact Now. Once again, be patient, because depending on the initial file size, this could take awhile.


How do we spring clean your computer for malware, viruses etc?

 
If we are doing a specific hunt for trouble or even a simple checkover and report we look in a few places to see what we would expect in the way of performance.
If a machine is slow and it should be fast then we look for malware. Malware is the generic name for anything that is in your system that shouldn’t be there, in a harmful sort of way. If you haven’t seen our youtube video then have a look at this first, which was an interview between Elene Marsden and Glyn Cheeseman and Glyn Cheeseman of CMX Business Computing https://www.youtube.com/watch?v=mLwhPyfDXQw
Here is the list we use at CMX. There are more items but this is a good start. Some of these are best run in safe mode and if you don’t know hopw to get there then call us and we will tell you as we would like to know that you are doing the right thing rather than the wrong thing.
  1. We look at the system to see if it should be fast. Obviousy you cant do this as you usually only know about your machine, whereas we have used hundreds.
  2. We run task manager and look at the programs that are running and how much memory is in use and available,
  3. We run the system restore (Start>programs>accessories>system tools>system restore) to see if there are restore points. This is usually a good sign if its available and a bad sign if it isn’t !
  4. If a system really seems a problem we run Stinger which is available at http://www.mcafee.com/uk/downloads/free-tools/stinger.aspx and Trend http://www.trendmicro.com/threatdetector 
  5. We then run an online virus scanner such as Eset or trend housecall. These downloads are a one off virus scanner, its up to date and remote so it cant be fooled. These can be downloaded from our help page at http://www.cmx.co.uk/Support/Downloads
  6. After that we go looking for the lower threat spyware, the stuff that might not steal your data but it slows the machine down. There are two we use and both are good, we run these each at least once. Malware bytes and Spybot S&D. Again these can be found on http://www.cmx.co.uk/Support/Downloads.
  7. We also have a nice product which is buit techie called hijackthis. It looks at all your startup files and then produces a report which we analyse. If you know what you are doing its great. Cut and paste the report at http://www.hijackthis.de and you get an analysis. WE have sometimes found things here that other sites miss.
We also install a free trial of an anti virus package for you to try for 30 days.
If it’s still a problem then contact us as there are many other things that can be done and it usually takes atrained person to get to the bottom of the problem – and don’t try and fix it yourself weith all the other tools that are available on the internet. Some are safe but dangerous and others are just more problems.
If the idea is about as appealing as a DIY appendectomy so you don’t want to do it yourself,  then call us, it will cost £35 for an examination.

As seen on TV, ok then, Youtube all about Cryptocker & GameOverZeus


I recently did a google hangout video about malware which you can see on youtube, it hasn’t gone viral yet and it’s unlikely to. https://www.youtube.com/watch?v=mLwhPyfDXQw

One of the things we coverered briefly was GameOver Zeus and Crypto locker and although we covered it a couple of months it’s only become headline news in the last week.

Lets get some factors out the way:

  • Its unlikely you have got it, only about 7% of PC’s have it
  • It can be easily removed with a number of tools before the “deadline”
  • Its only news as the FBI & NCA managed to trap it
  • Its not a uniquepiece of malware
  • You mainly get it from opening attachements from unsolicited emails

What are they?

There are two scares. GameOverZeus and Cryptolocker. The first is a bot net, it waits until you are doing something like on line banking or paying a bill and it connects to anothert computer and gives them your details. Cryptolocker encryptsd all your data files, even down a network, and if you dont poay a ransom the files are lost to you forever.

The FBI, the UK’s National Crime Agency and other international law enforcement agencies have worked together to disrupt the GameOver Zeus botnet and the Cryptolocker ransomware network. More information on how these work can be found at: http://www.nationalcrimeagency.gov.uk/news/news-listings/386-two-week-opportunity-for-uk-to-reduce-threat-from-powerful-computer-attack

How do I know if I have it?

According to the FBI if your computer is affected it may be displaying the following symptoms:

  • Your computer system operates very slowly.
  • Your cursor moves erratically with no input from you.
  • You notice unauthorized logins to your bank accounts or unauthorized money transfers.
  • Text-based chat windows appear on your computer’s desktop unexpectedly.
  • Your computer files lock up and a ransom demand is made to unlock files.

Internet Service Providers are currently making checks, so it is possible that you may receive notification from them that you are a victim of this malware. If this is the case you will be asked to back up all your important files, photographs, videos.

If you run the normal security procedures you should be protected. We would recommend taking the following actions. Note that most of these are standard common sense behavious::

Standard precautions to prevent malwares
Ensure you have a current active version of anti-virus software and that this anti-virus software is up-to-date. Most of the established anti-virus programs are able to detect and stop the virus – so run a scan. If you are in doubt about whether your anti-virus program is able to detect this virus then we would recommend checking their website and/or contacting your supplier. In our opinion paid-for is better than free, call us and we will explain.

Change your passwords, make them strong and don’t have the same passwords for everything. If your computer has been infected, your passwords may have been compromised. So we recommend you change your passwords as a precaution.

Ensure your Windows software has the latest Security updates.

Backup your important files. Lots of places and plenty of times. Only one copy is asking for trouble.

How do I check and get rid of them?
There are several tools that will remove these but its better to use a general removal tool. The one we favour most is the Trend tool.

http://www.trendmicro.com/threatdetector

If you have any doubts or want personal advice then contact us by any means you favour. I am sure you will find a way!

If you have any suspicions call in you local friendly IT specialist, not a mate down the pub!